Cushions
A pressure-care cushion should be selected after assessing skin risk, sitting posture, sensation, mobility, transfers, continence, cognition, body measurements, chair dimensions and daily routine. A cushion does not replace repositioning, skin checks, nutrition, continence care or management of the cause of pressure.
Overview
Seat cushions may be used for:
- Comfort
- Pressure redistribution
- Skin protection
- Postural support
- Pelvic stability
- Pain management
- Reducing the effect of prolonged sitting
- Supporting wheelchair or chair use
Common cushion types include:
- Standard foam
- High-density foam
- Viscoelastic or memory foam
- Contoured foam
- Gel
- Gel-grid cushions
- Air-cell cushions
- Hybrid foam-and-air cushions
- Hybrid foam-and-gel cushions
How to Choose a Cushion
Selection should consider:
- Pressure injury risk
- Current or previous pressure injury
- Sitting duration
- Ability to reposition independently
- Sensation
- Continence and moisture
- Skin condition
- Pelvic posture
- Trunk control
- Lower-limb position
- Body weight and measurements
- Heat and perspiration
- Transfers
- Cushion weight
- Maintenance ability
- Carer support
- Chair dimensions
- Seat-to-floor height
- Cost and funding
- Manufacturer instructions
Cushion Type Comparison
| Feature | Foam cushion | Gel cushion | Air cushion |
|---|---|---|---|
| Pressure redistribution | Low to moderate, depending on design | Moderate to high, depending on design | Often high when correctly adjusted |
| Adjustment | Usually none | Usually none | Inflation can be adjusted |
| Maintenance | Low | Low to moderate | Higher |
| Weight | Usually light | Often heavier | Usually light |
| Stability | Usually good | Usually good | May feel less stable |
| Heat | Can retain heat | Often temperature-neutral or cooler depending on design | Airflow varies by cover and design |
| Puncture risk | No | Low | Yes |
| Bottoming-out risk | Yes if compressed or worn | Possible if unsuitable or damaged | Yes if underinflated |
| Setup | Simple | Simple | Requires inflation and checking |
| Postural support | Good with contouring | Varies | Varies by cell and compartment design |
| Best suited to | Comfort and low-to-moderate needs | Pressure redistribution with low setup burden | Higher skin-protection needs and adjustable immersion |
Foam Cushions
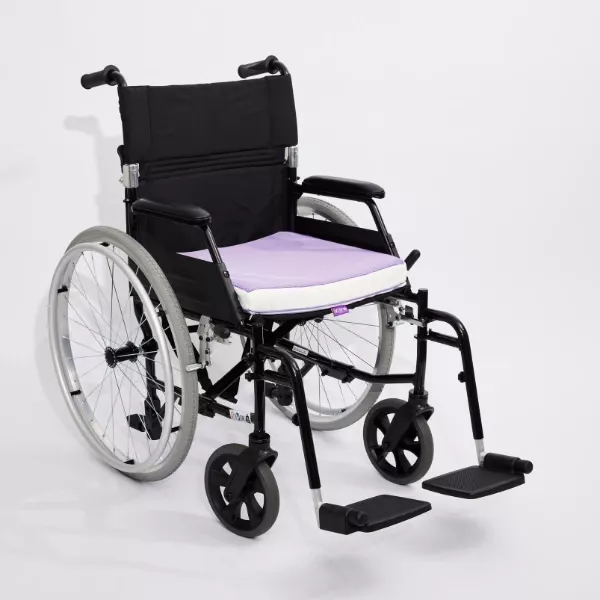
Foam cushions use one or more layers of foam.
Types include:
- Standard polyurethane foam
- High-density foam
- Viscoelastic or memory foam
- Layered foam
- Contoured foam
- Foam with pelvic well or thigh guides
Benefits
- Simple to use
- Usually lightweight
- No inflation required
- Low maintenance
- Often stable for transfers
- Can provide postural contouring
- Usually less expensive than complex air cushions
- Easy for clients and carers to understand
Limitations
- Foam may compress over time
- Lower-quality foam may bottom out
- Memory foam may retain heat
- Pressure redistribution varies greatly
- Fixed contour may not suit changing posture
- Fluid contamination can damage unprotected foam
- Cushion height may alter transfers and foot support
Suitable For
- Comfort needs
- Low-to-moderate pressure risk
- People who can reposition
- People who need a stable transfer surface
- Users who cannot manage air-cushion maintenance
- Home chairs, wheelchairs or vehicles when dimensions are suitable
Icare Seat Cushion Example
The Icare Seat Cushion uses a high-density viscoelastic core with a washable zip-off cover. The manufacturer describes the foam as moulding around the body rather than pushing back like standard foam.
Consider it when:
- Comfort is the primary goal
- Mild pressure redistribution is required
- A low-maintenance cushion is preferred
- The user needs a stable surface
- The cushion is being used in a wheelchair, car or household chair
Check:
- Exact size
- Cushion height
- Chair compatibility
- Whether pressure risk exceeds the product’s intended use
- Cover condition
- Foam compression
Gel Cushions
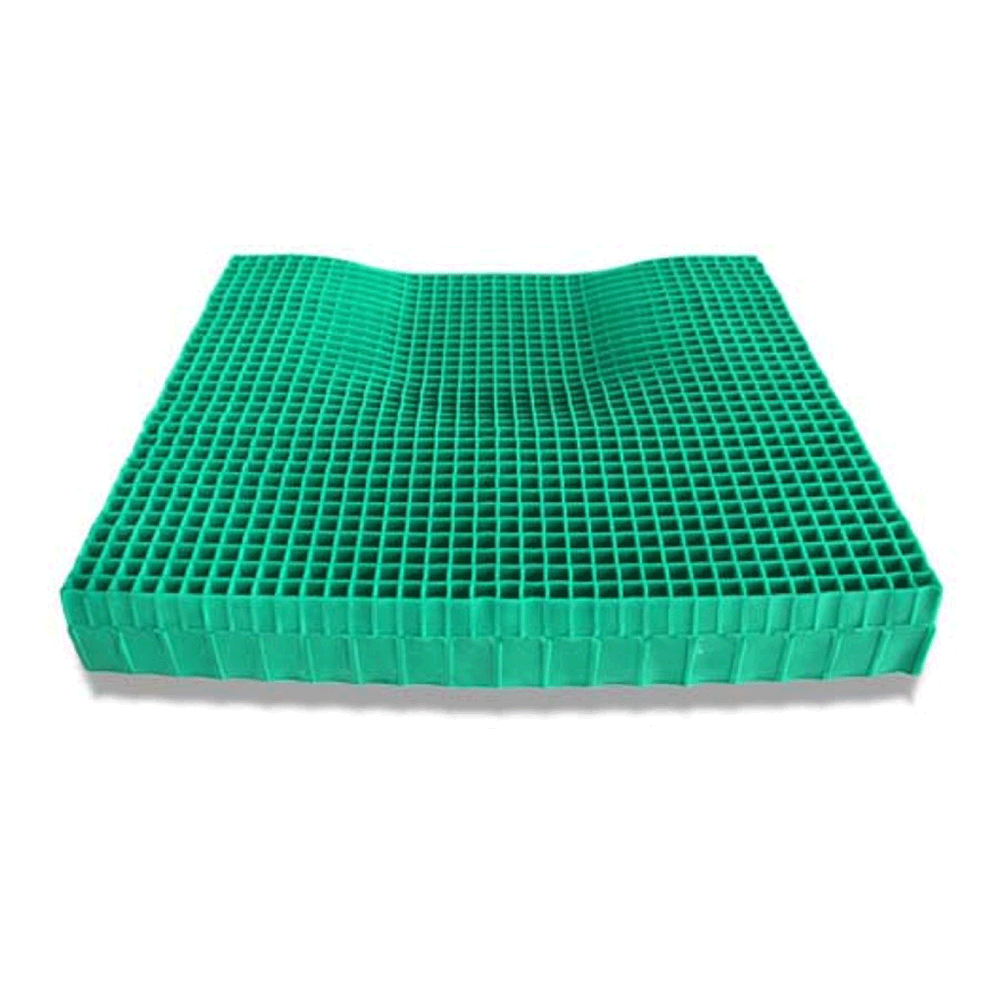
Gel cushions may use:
- Fluid gel packs
- Solid gel
- Gel grids
- Gel combined with foam
- Column-buckling gel structures
Benefits
- No inflation required
- May provide good immersion
- Often stable
- May reduce peak pressure
- Can suit people who cannot manage air pressure
- Some products are temperature-neutral
- Often easy to use once correctly selected
Limitations
- Can be heavier than foam or air
- Some gel packs can migrate or bunch
- Damage or leakage can occur in fluid-gel designs
- May be difficult to carry
- Fixed design offers limited adjustment
- Some users find gel firm
- Pressure performance varies by product
- Incorrect size can reduce benefit
Suitable For
- Moderate pressure-care needs
- People requiring low maintenance
- Users who prefer a stable surface
- People who cannot manage inflation checks
- Users needing pressure redistribution without an air system
EquaGel General Example
The EquaGel General is a gel-grid cushion with mild contouring for everyday use. Aidacare describes the EquaGel range as having breathable, water-resistant, multi-stretch covers and wheelchair attachment straps.
Potential benefits:
- No inflation
- Low setup burden
- Mild pelvic contouring
- Pressure redistribution through column-buckling gel
- Flexible use on wheelchair seats
- Water-resistant cover
Potential limitations:
- Heavier than many foam or air cushions
- No inflation adjustment
- Mild contour may be insufficient for complex posture
- Exact dimensions must match the chair and user
- A deeper-support EquaGel model may be more appropriate for higher postural needs
Air Cushions
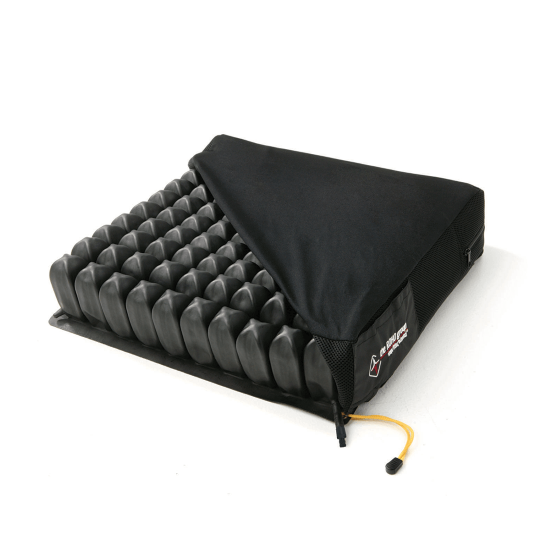
Air cushions use interconnected or compartmented air cells.
Examples include:
- Single-compartment air cushions
- Multi-compartment air cushions
- Low-, mid- and high-profile cells
- Air cushions with positioning valves
- Air-and-foam hybrid cushions
Benefits
- Adjustable immersion
- Can conform closely to body shape
- May reduce pressure and shear
- Lightweight
- May suit asymmetrical body shapes
- Some models allow compartment adjustment
- Can support high pressure-injury risk when properly prescribed
Limitations
- Requires correct inflation
- Requires regular checks
- Can leak or puncture
- May feel unstable
- Overinflation reduces immersion
- Underinflation may cause bottoming out
- Valves and pumps must be managed
- Air volume can change with temperature or altitude
- May be difficult for people with reduced cognition, hand function or vision
Suitable For
- High pressure-injury risk
- Reduced or absent sensation
- Previous pressure injury
- Limited ability to reposition
- Significant bony prominence
- Need for adjustable immersion
- Complex body shape
- Users with reliable self-management or carer support
ROHO Example
ROHO cushions use interconnected air cells designed to allow immersion and reduce pressure, friction and shear. Models differ in cell height, number of compartments and postural-control features.
Potential benefits:
- Adjustable
- Lightweight
- High level of skin protection
- Can accommodate asymmetry
- Replaceable cover and repair options
- Some models provide separate positioning compartments
Potential limitations:
- Setup is essential
- Daily or regular hand checks may be required
- Puncture risk
- Valve management
- Greater training need
- May affect transfer stability
- Cushion can be installed backwards or upside down
- Incorrect air level may increase risk
How to Inflate a ROHO-Style Air Cushion
Use the instructions supplied with the exact cushion. The steps below describe the common ROHO hand-check method and do not replace the manufacturer’s manual.
Initial Setup
- Place the cushion on the chair with the air cells facing upward.
- Position the cushion in the correct direction.
- Open the valve.
- Attach the hand pump.
- Inflate until the cells become firm and the cushion begins to arch slightly.
- Close the valve.
- Remove the pump.
- Transfer the person onto the cushion in their usual sitting position.
Hand Check
- Slide a hand between the cushion and the person.
- Locate the lowest bony prominence, usually under the pelvis.
- Open the valve slowly.
- Release air while maintaining the hand position.
- Stop when the person is immersed but remains supported above the cushion base.
- Close the valve.
- Recheck all compartments when the cushion has more than one valve.
For many ROHO Dry Floatation cushions, the manufacturer’s guide describes a target clearance of about 1.5–2.5 cm between the lowest bony prominence and the base.
Signs of Overinflation
- Person sits high on the cushion
- Cushion feels hard
- Poor immersion
- Reduced stability
- Increased pressure at bony areas
- Difficulty reaching footplates or floor
Signs of Underinflation
- Bony prominence contacts the base
- Cushion looks flat
- Reduced support
- Increased pelvic instability
- Bottoming out
- Skin redness or discomfort
Ongoing Checks
- Check inflation according to the manufacturer’s instructions
- Recheck after major temperature or altitude changes
- Recheck after weight change
- Check after transfers or transport
- Inspect for leaks
- Keep the pump available
- Ensure carers know the correct setup
How to Match Cushion Type to the Person
| Clinical presentation | Often consider | Main caution |
|---|---|---|
| Comfort only, intact sensation, independent repositioning | Foam | Monitor compression and heat |
| Mild-to-moderate pressure risk | High-quality foam or gel | Confirm no bottoming out |
| High pressure risk | Air, advanced gel or hybrid | Requires specialist assessment |
| Previous pressure injury | Air, advanced gel or hybrid | Confirm wound location and offloading |
| Poor cognition | Foam or gel | Avoid systems requiring complex checks unless carers manage them |
| Poor hand function | Foam or gel | Air cushion may require carer support |
| Frequent transfers | Stable contoured foam or gel | High air cells may reduce stability |
| Significant asymmetry | Multi-compartment air or custom contour | Specialist seating assessment |
| Heat and sweating | Breathable cover, gel-grid or ventilated design | Moisture must still be managed |
| Bariatric user | Suitable dimensions and safe working load | Avoid undersized cushions |
| Pelvic instability | Contoured foam, gel or compartmented air | Pressure care and posture must be balanced |
| Low seat-to-floor clearance | Low-profile cushion | Ensure pressure protection remains adequate |
Measurements
Record:
- Hip width
- Thigh length
- Seat width
- Seat depth
- Cushion width
- Cushion depth
- Cushion height
- Seat-to-floor height
- Foot support
- Armrest height
- Safe working load
- Pelvic posture
- Location of bony prominences
Width
The cushion should:
- Support the pelvis and thighs
- Fit the chair without curling
- Avoid large side gaps
- Avoid being compressed between armrests
Depth
The cushion should:
- Support the thighs
- Avoid pressure behind the knees
- Match the chair seat depth
- Allow safe foot support
Height
Cushion height may affect:
- Transfers
- Foot contact
- Armrest height
- Table access
- Wheelchair propulsion
- Headroom
- Vehicle access
- Pressure redistribution
Cover Selection
A cushion cover should be:
- Correctly fitted
- Stretchable enough to allow immersion
- Breathable where possible
- Water-resistant when required
- Non-slip underneath
- Free from wrinkles
- Easy to remove and clean
Avoid adding towels, incontinence pads or folded fabric over the cushion unless clinically assessed. Extra layers may reduce immersion, increase heat and create creases.
Trial and Assessment
Trial the cushion in the usual chair.
Assess:
- Pelvic alignment
- Trunk posture
- Foot support
- Pressure areas
- Comfort
- Stability
- Transfers
- Functional reach
- Propulsion
- Sitting duration
- Heat and moisture
- Ability to reposition
- Client preference
- Carer ability
- Skin response after sitting
Pressure mapping may assist complex prescription but should not replace clinical assessment.
Pressure Injury Staging
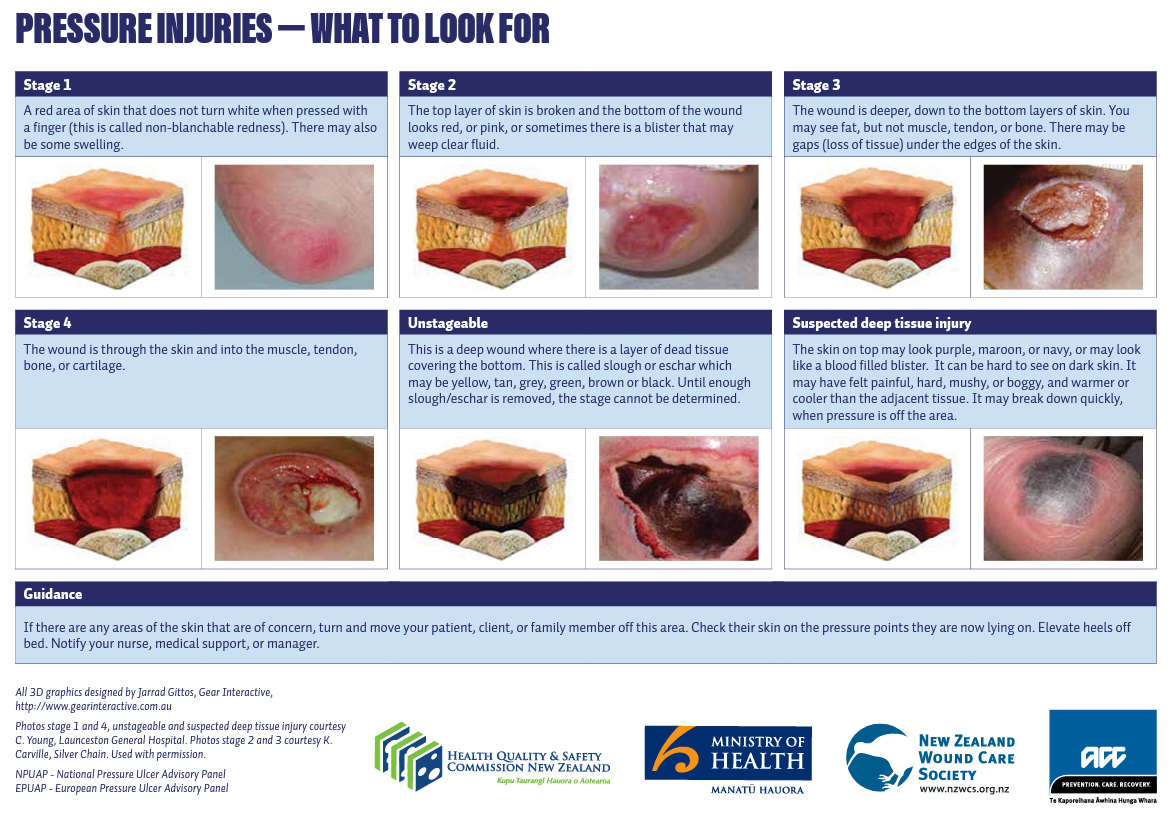
Pressure injuries are staged according to the depth and type of tissue damage.
Stage 1
- Skin remains intact
- Localised non-blanchable redness
- Colour change may appear differently in darker skin
- Area may be painful, firm, soft, warmer or cooler
Stage 2
- Partial-thickness skin loss
- Exposed dermis
- May appear as a shallow open wound or blister
- No visible fat or deeper structures
Stage 3
- Full-thickness skin loss
- Fat may be visible
- Slough or undermining may be present
- Muscle, tendon and bone are not exposed
Stage 4
- Full-thickness skin and tissue loss
- Exposed or directly palpable deeper structures such as muscle, tendon, cartilage or bone may be present
- Undermining and tunnelling may occur
Unstageable Pressure Injury
- Full-thickness tissue loss is present
- The wound depth cannot be confirmed because slough or eschar obscures the base
Deep Tissue Pressure Injury
- Persistent deep red, maroon or purple discolouration
- Skin may be intact or open
- May include a blood-filled blister
- Damage can progress rapidly
Staging should be completed by a clinician with appropriate wound-assessment competence.
Safety Issues
- A cushion does not eliminate pressure-injury risk
- Do not use an incorrect size
- Do not place an air cushion upside down or backwards
- Do not use a leaking air cushion
- Do not overinflate or underinflate
- Do not add unapproved layers
- Do not use damaged foam or gel
- Check skin regularly
- Review after weight, posture, mobility or continence changes
- Review after any new redness, blister, wound or pain
- Do not use a cushion as a substitute for medical or wound care
Cleaning and Maintenance
Foam or Gel
- Follow cover-washing instructions
- Keep the inner cushion dry unless approved for washing
- Inspect for compression, splitting or contamination
- Replace if the cushion no longer returns to shape
- Check gel for leakage or bunching
- Dry the cover fully before use
Air
- Follow manufacturer cleaning instructions
- Close valves before washing when instructed
- Avoid sharp objects
- Check for leaks
- Use the supplied repair kit only as directed
- Inspect the valve
- Check inflation regularly
- Keep the pump available
Review Triggers
- New skin redness
- Stage 1 or higher pressure injury
- Pain or discomfort
- Weight change
- Postural change
- Increased sitting time
- Reduced repositioning
- Change in continence
- Change in cognition
- Cushion damage
- Recurrent loss of air
- New wheelchair or chair
- Change in transfer method
Client Instructions
Before Sitting
- Check the cushion is correctly positioned.
- Check the cover is smooth.
- Check air pressure when applicable.
- Remove objects from pockets.
- Check the skin as instructed.
While Sitting
- Reposition according to the care plan.
- Avoid sliding forward.
- Keep feet supported.
- Report discomfort, heat, numbness or pain.
- Avoid sitting on extra towels or folded pads.
Stop Using and Seek Review When
- Skin remains red after pressure is removed
- A blister or wound appears
- The cushion is damaged
- An air cushion loses air
- The person bottoms out
- Sitting becomes painful or unstable
Related Notes
- Pressure Injury Prevention and Management
- Wheelchairs
- Seating Assessment
- Pressure Mattresses
- Positioning Supports
References
- Aidacare. EquaGel Cushions: https://www.aidacare.com.au/products/cushions-positioning/pressure-care-cushions/equagel/
- Permobil. ROHO Single Compartment Cushion: https://www.permobil.com/en-au/products/seating-positioning/cushioning-products/roho/standard-series/roho-single-compartment-cushion
- Permobil. ROHO Cushion Inflation and Adjustment Guide: https://hub.permobil.com/hubfs/APAC%20Region/4.%20Seating%20And%20Positioning/1.%20ROHO/2.%20Campaigns/2025/ROHO%20Skills%20-%20AU/APAC%20AU%20ROHO%20Skills%20Inflation%20Guides%20STANDARD.pdf
- NovitaTech. Icare Seat Cushion: https://www.novitatech.com.au/shop/icare-cushion-seat/
- NSW Agency for Clinical Innovation. Pressure Injury Toolkit: https://aci.health.nsw.gov.au/networks/spinal-cord-injury/pi-toolkit
- Victorian Department of Health. Pressure injuries and skin tears: https://www.health.vic.gov.au/older-people-in-hospital/pressure-injuries-and-skin-tears-0
- Relevant manufacturer instructions and organisational procedures